Post your DIY projects here

No drywall is waterproof!!! There is water resistant drywall commonly called greenboard but no one usses that in showers anymore. You should use concrete backerboard or cement board known as durock.


I am using a greenboard for my bathroom.
 
I am using a greenboard for my bathroom.

I think that is ok BUT not a good idea for shower walls. Cement backerboard or Hardibacker board are best and should be 1/2 inch, especially if you're going to tile the shower walls. Put 15 lb felt or tarpaper up first before the backerboard to create a vapor barrier.
 
I am using a greenboard for my bathroom.

The drywall contains an oil-based additive in the green colored paper covering that provides moisture resistance. It does not provide water proofing -- for that you will need cement board and a product called ditra. Ditra is like a rubbery membrane you can apply with thin set over the cement board. On top of the ditra you can put tile.

Resistance is much different then proofing and only proofing will provide you with a 100% assurance that no water will destroy your walls or surrounds.

If you have not experienced problems yet then you are either lucky or the damage that already exist is hidden.

I bet you used drywall screws which are short and can pop out or one's that can rust???? I don't think they make rust proof drywall screws. I know they make them for the cement board as I have used them before.

Schluter-DITRA - Schluter-Systems

DUROCK Brand Cement Board

Oh, and tousi gave you some good advice too, but the ditra I suggested using is more waterproofing then the felt he recomened. That ditra is like putting a big rubber gasket all the way around your shower walls.
 
Last edited:
Green board for those who don't know is for places like laundry rooms, sometimes basements, 1/2 baths, etc.
 
We're almost finished with our kitchen projects. Just a little touch up and the ceiling are left.

First, some before pictures:
 

Attachments

  • counterduring1.jpg
    counterduring1.jpg
    56 KB · Views: 19
  • counterduring2.jpg
    counterduring2.jpg
    80.2 KB · Views: 15
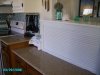
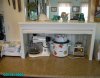
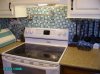
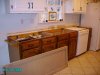
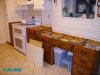
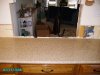
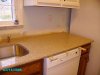
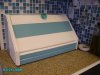
The new countertops are Silestone. The making and installing of the new countertops were not diy; we had the professionals do that. Hubby did the prep work of removing the old countertops, molding, and backsplash. He also had to disconnect and remove the old sink and faucets, move outlets, and loosen the dishwasher. I did lots of cleanup, including rewashing every single item that was in all the cabinet drawers. :p

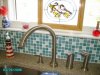
Prior to the work, we bought matching stainless steel faucet set and pot filler from Ebay, for less than a third the cost of retail stores. We also bought a new undermount stainless double sink from Ebay. It too, was less than a third the price, better quality gauge, deeper, and more insulated than Lowes or Home Depot offered.

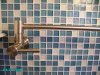
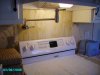
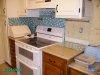
Here's the potfiller roughed in:
 

Attachments

  • potfiller1.jpg
    potfiller1.jpg
    65.7 KB · Views: 14
  • potfiller2.jpg
    potfiller2.jpg
    68.6 KB · Views: 13
New countertops on. The pictures don't do justice to the colors.
 

Attachments

  • counterduring1a.jpg
    counterduring1a.jpg
    69.3 KB · Views: 13
  • counterduring2a.jpg
    counterduring2a.jpg
    69.8 KB · Views: 15
  • counterduring4a.jpg
    counterduring4a.jpg
    89.9 KB · Views: 16
Hubby did all the backsplash tile work himself. The tiles are glass mosaic, shades of aqua and white. White grout used. This is a "during" picture:
 

Attachments

  • backsplashduring2.jpg
    backsplashduring2.jpg
    87.2 KB · Views: 16
Small kitchen project--my bread box.

It was an old wooden one with a white porcelain knob. I wanted it to "blend" better with the backsplash. Hubby took one of the tiles to the paint store, and they matched the color for a quart of glossy paint. We used the paint to put "awning" stripes on my box. I found a place on line that sells "sea glass" knobs, and bought one.

We used the rest of the special paint to make a contrasting border around the window. Yes, those are real starfish.
 

Attachments

  • breadboxbefore.jpg
    breadboxbefore.jpg
    39.5 KB · Views: 14
  • breadbox1.jpg
    breadbox1.jpg
    89.2 KB · Views: 15
  • starfish3.jpg
    starfish3.jpg
    74.7 KB · Views: 14
New faucets. (Flowers are real azaleas from my yard.)
 

Attachments

  • faucet.jpg
    faucet.jpg
    80.6 KB · Views: 16
Reba and Liebling ....

The pictures of your DIY ventures and renovations to furnitures/rooms are fantastic! Wow! It made my jaw drop .... loved the results!

Love watching those DIY/renovation TV programs we have here ... always waiting in anticipation of the before/after outcomes ... I cannot get enough of it. I have a great admiration for people who can do DIY projects. :applause:

:ty: for showing them on AD. :)
 
The appliance garage was custom made from Home Depot but Hubby had to cut the hole in the wall to insert it. Then he had to put new sheet rock on the family room side of the wall, mud, sand, paint it, and put on a new piece of chair rail molding. (Yes, that's a real sand dollar.) Then he had to put new bead board and molding on the kitchen wall side. He made and installed a new shelf on top of the garage, and redid the trim around the pass through window.
 

Attachments

  • garageclosed.jpg
    garageclosed.jpg
    81.6 KB · Views: 16
  • opengarage.jpg
    opengarage.jpg
    84 KB · Views: 17
  • fmfamilyrm1.jpg
    fmfamilyrm1.jpg
    57 KB · Views: 17
Close up of the tile.
 

Attachments

  • tileclose1.jpg
    tileclose1.jpg
    94.5 KB · Views: 15
Finished kitchen:
 

Attachments

  • lighthouses1.jpg
    lighthouses1.jpg
    82.4 KB · Views: 30
  • sinkside5.jpg
    sinkside5.jpg
    83.2 KB · Views: 29
  • sinkside6.jpg
    sinkside6.jpg
    79.9 KB · Views: 23
  • stoveside.jpg
    stoveside.jpg
    86.7 KB · Views: 29
Nice job!

My hubby just ordered stuff for the front yard so I better take a "before" pic of my front yard tmw. It is too dark now. I cant wait to see the finished results. :)
 
Reba ...

You must have a fascination with lighthouses .... love the lighthouse soap dispenser next to the kitchen sink. :)

May I ask what is the long tap-like gadget on the wall above the stove?
 
Your kitchen is nice. My kitchen is about the same size as yours.

I met a man to talk about my kitchen renovation at the Home Show a couple of weeks ago. Recently, he came to my house and to look at my kitchen.

He suggested me to buy all cabinet doors, wood plates, and a counter. He showed me the options for the materials. He said that it cost 17,000 dollars. Then, he said that I could pay him for 15,000 right away. He also said that his company is number one at the top line of the company. I nodded. I am so disgusted that he said that to me. Actually, I turned him down later.

I believe that it would cost me 800 dollars for the door replacements if I hire a local professional. The counter is hard to pick. I like your sink and it is under the counter. That's what I plan for my kitchen.

I'm surprised that you bought the faucet on eBay because it is probably used - perhaps not. Oh, I forgot to mention that I need a new floor and all new windows. Oh boy, that's another money.

I am still searching for good windows that has krypton gas with 3 glasses.
 
Last edited:
Back
Top